EyesOff: How I Built A Privacy macOS App Using Local ML Models
EyesOff - A Need for Privacy
We’ve all felt the uncomfortable moment we catch someone glancing at (or worse watching) our laptop screen, whether at a coffee shop, on a flight or while in the library. As we choose to work from a wider variety of spaces, these privacy concerns will only grow. It’s out of this context that I developed EyesOff, which utilises your onboard webcam and a locally running neural network to alert you when anyone is looking at your screen! The best part is, with EyesOff you are fully in charge of your privacy, your data is all processed locally without ever being sent to the cloud1.
The app is quite simple: EyesOff creates a live video stream from your webcam and passes the frames to a locally running Neural Network (NN) called YuNet. This model processes the images to detect faces, and if the number of faces exceeds your chosen threshold, EyesOff notifies you by displaying an alert on your screen. The threshold lets you control how many people can view your screen without triggering an alert. For example, if threshold=1, when only you are looking at your screen there will be no alert, but as soon as someone else enters the frame, YuNet identifies two faces and EyesOff immediately notifies you.
There are a few steps in developing an application for Mac and we will discuss them in no particular order in this post. Feel free to jump around the post each will be self-contained with an overall theme of the EyesOff app.
A Small Local Neural Network - YuNet
In the current zeitgeist small models have fallen out of favour (with a lot of emphasis being placed on scale), however YuNet and EyesOff showcase a perfect example of where they still matter. There are usually two approaches when using NNs in your development, either run the model locally or make a call to some API and have the model run on someone else’s servers. The second approach has two issues, firstly you must send your data to an external vendor and waiting for the API response is too slow for an application like EyesOff, because if an alert is made but the person has already left the frame EyesOff is useless.
Nonetheless, local models do have one big issue (especially small ones), they tend to underperform the large models. This is a tradeoff between performance and the ability of a model to complete harder tasks. Still, we are left with little choice here, running a larger model is too prohibitive for EyesOff. We cannot create an app which ends up using 80% of your CPU and RAM, draining your battery in the process. EyesOff is designed to be low impact on your machine.
In steps YuNet, a very small Neural Network (NN) with only 75,856 parameters, making it extremely lightweight2. As a result EyesOff can run in the background with little impact on battery and CPU usage. Furthermore, despite it’s size its an extremely strong model. YuNet is able to detect faces which occupy as little as 10x10 3 pixels which really helps with long range detections (keeping peeping eyes away from a distance!). YuNet accepts as input images of size 340x340, so it can detect a face which occupies as little as 0.08% of the input image (\((10*10)/(340*340)\)). In contrast BlazeFace from Google’s MediaPipe cannot make detections at ranges greater than 2 meters which was a big limitation in EyesOff, as I had started development using MediaPipe4.
Lastly, YuNet is fully open source, which aligns perfectly with the transparency needed for privacy-focused applications. You can check out the research paper here: https://link.springer.com/article/10.1007/s11633-023-1423-y.
This combination of being lightweight, effective, and open source makes YuNet ideal for privacy-centric applications. After all, what use would a privacy-based app be if it sent your data across the web? Small models that can run locally give us back control over our data, which is priceless5. But, large models certainly have their place and can perform many tasks that are currently beyond the capabilities of smaller models. However, this doesn’t mean we should always have to sacrifice our privacy and data to benefit from this remarkable technology.
Accelerating Building with AI
Speaking of large models and their place, one area in which they excel is code generation. This ability of Large Language Models (LLMs) has been increasing at such a fast pace that I wanted to test it out when building EyesOff.
Some context - I began development of this app many months ago, however I dropped the project as I wasn’t familiar with PyQt (used for the GUI) and did not have much time to pick it up. So, when I heard that Anthropic released Claude Code6, a coding tool which utilises the Claude models, I knew I needed to test it out with building EyesOff.
From a short prompt I built the underlying framework of EyesOff. Pretty much all of the groundwork was completed by Claude Code, in just a few hours it had completed something which would have taken me months! Honestly, this was quite a sobering moment, however with time I realised the beauty of it all. This tool, had allowed me to develop something from an idea and I think this is amazing as AI can act as a tool for true empowerment. Now the goal of us developers is to utilise the tools given to build, build, build!
Tools like Cursor7, Claude Code and others all allow us to build much faster… Note, I still think for those learning it’s best to proceed without these tools, however it’s a different story when you’re trying to build. The goal in building any piece of software should always be to provide value for the end user8 and I think AI allows us to get value for end users much quicker. How we get to that value doesn’t really matter, whether you use Python, Java, C++ or assembly, whether or not you use the most optimal algorithms, when it comes down to it none of this matters to the end user. What that means is AI empowers us to do more with the limited time we have. We can develop more of our ideas, quickly get them out to users and iterate on our designs - remember not all ideas are good ideas, the only way to know which are the good and the bad is to get them out to users, with AI we can do this at an exponentially fast pace.
From a technical perspective, working with LLMs while coding is relatively simple now. You can install tools like Cursor or Claude code and get started right away. In this app I found the LLM performed the best at the start of the project, however as things got more complex it’s ability to make logical changes reduced. I’d sometimes give the tool a prompt to make a seemingly simple change, it’d come back with a whole bunch of files edited and it wouldn’t even implement what I had asked it to. I’d also recommend you review the code changes being made, inspecting imports and links to external resources are especially important. Alas, there was nothing that me + Claude Code could not do, and I think this is where the true power lies (for now).
Packaging a Mac Application for Distribution
At this point EyesOff is a (small) fully fledged python project, how can we convert that into a package which people can use easily? Note, at the time of writing my application only supports macOS, I hope to add other OS’s soon, as such this guide is specifically for macOS applications.
There are a few steps involved, but it all boils down to visiting the developer.apple.com website and some bash commands. I started with a very useful library called Encrust9 which provides a walk through guide on how to get your dev environment setup to publish your app. When you install Encrust you can run the command “encrust configure” which gives you the following instructions:

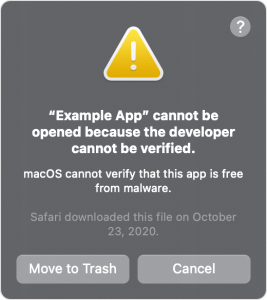
Encrust is setup to work with a library called py2app, which does exactly what it says on the tin, taking your python source code and creating a .app file. Note that it costs roughly $100 or £80 to get an apple developer account, however it is necessary to notarise and code sign your app, which itself is necessary to stop the warning that macOS throws when an app is not code signed:
If you are just developing an app for yourself or a few friends you can certainly get around this warning, head to Settings and in privacy you will see an option to allow running of whatever your app is called. However, it’s not acceptable to get such a warning if you are releasing your app to the masses.
On using encrust, once you run encrust auth you will get a whole bunch of popups to enter your password, it may seem like nothing is happening but as you enter and submit each one view your terminal and you will see progress being made. These popups are accessing the keychain to get your Apple developer certificate required for code signing and notarisation. Eventually, you’ll end up with a folder called /dist, within that is a .app file which you can run! Depending upon the packages you used, this .app file may or may not be large in size. For example my first .app for EyesOff was around 600mb which doesn’t make sense for such a small and simple app. The large size of the .app file is a result of all the Python dependencies being bundled within the .app directory, this is necessary to ensure your app will run on any users machine (where they may or may not have the dependencies installed). This is one area where py2app didn’t perform so well, it seems to be unable to distinguish between modules you have and have not used in your imported libraries. E.g. I made use of PyQt but only a few of the core modules nowhere near the entire thing but py2app would just throw the whole of PyQt into my .app, which resulted in the ballooning and similarly for numpy.
Now, this may or may not have been caused by me. I say this as when you use py2app you get access to a setup.py file and in this file you can specify what resources you want to include in your .app. I had to include things like my NN model files, you also have access to a “settings” section, in which it is possible to include or exclude files. I tried to exclude some of the files in Python modules however I don’t think it works as expected. The “exclude” section is probably meant to work with files/folders in your python project directory rather than being use to explicitly remove certain modules in the dependencies. This was evidenced by the fact that whole libraries and all their dependencies were being included in the .app despite my explicit references in the “exclude” section of my setup.py. I read that pyinstaller10 handles dependencies better, by actually looking at which parts of libraries you have and have not used in your code. For that reason I went with pyinstaller to create my final app bundle.
Now I will show you my full list of commands to get a .dmg file. A .dmg file is a disk image file and is usually how a lot of Mac apps are distributed. It allows users to quickly download and install your app in the proper manner (moving the app to applications, code checking etc):
TODO: Replace all sections within {…}
Step 0: Run pyinstaller to create the dist directory with the .app file
pyinstaller EyesOff.specStep 1: Code sign your app + entitlements
codesign --deep --force --options runtime --entitlements EyesOff.entitlements \
  --sign "Developer ID Application: {Apple ID Name} ({YOUR_TEAM_ID})" "dist/{Your app name}.app"
Step 2: Create a ZIP archive for notarization
ditto -c -k --keepParent "dist/{Your app name}.app" "{Your app name}.zip"Step 3: Submit for notarization (using your stored profile)
xcrun notarytool submit {Your app name}.zip --keychain-profile {Your keychain profile name} --waitStep 4: After successful notarization, staple the ticket to your app
xcrun stapler staple "dist/{Your app name}.app"Step 5: Create temporary directory for DMG contents
mkdir -p /tmp/dmg-contentsStep 6: Copy the notarized app to the temporary directory
cp -R "dist/{Your app name}.app" /tmp/dmg-contents/Step 7: Create the DMG Note: Install create-dmg with brew install create-dmg if needed
create-dmg \
  --volname "EyesOff" \
  --volicon "{the path to your icns file}/MyIcon.icns" \
  --window-pos 200 120 \
  --window-size 800 400 \
  --icon-size 100 \
  --icon "{Your app name}.app" 200 190 \
  --app-drop-link 600 185 \
  --no-internet-enable \
  "./{Your app name}.dmg" \
  "/tmp/dmg-contents/"
Step 8: Sign the DMG
codesign --sign "Developer ID Application: {Apple ID Name} ({YOUR_TEAM_ID})" \
  --options runtime ./{Your app name}.dmg
Step 9: Notarize the DMG
xcrun notarytool submit ./{Your app name}.dmg --keychain-profile {Your keychain profile name} --waitStep 10: Staple the notarization ticket to the DMG
xcrun stapler staple ./{Your app name}.dmgAnd there you have it, a fully fledged .app and .dmg file which can be distributed to others with ease (we are only 100$ shorter than we started xD).
Codesigning and Notarization
Codesigning is a macOS security process in which you certify that your app was created by you.[https://developer.apple.com/documentation/security/code-signing-services] After signing your app, the system can detect changes to the source code ensuring it doesn’t get changed maliciously and keeping the user safe. Next up you need to notarize your app, notarization includes Apple checking your app file for malicious intent/content and checks if your code signing worked as intended. Notarization is what prevents Figure 2 from occurring when a user downloads your app, once notarized when installing your app will display the following dialogue:
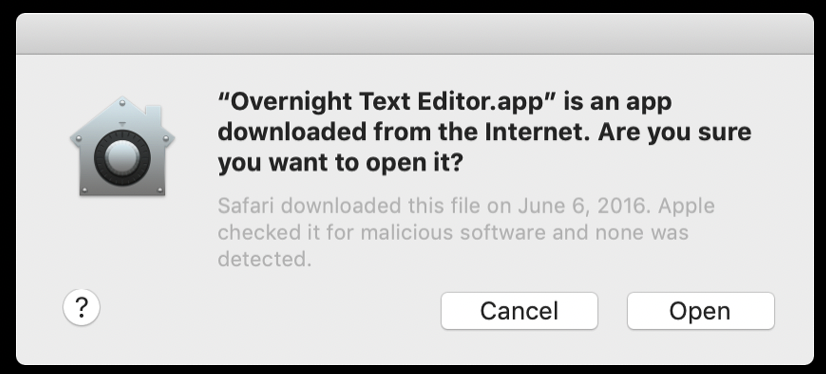
Which is a lot more friendly :)
Keep in mind, that you must code sign and notarize both your .app and your dmg file. Also, my commands here are what worked for me, you may need to edit the settings especially for the create-dmg command. If you have any trouble feel free to send me an email11
Distributing EyesOff
To distribute the app I considered a couple of options, I began with Cloudflare. I had already used their domain registry service to purchase my .app domain and planned on using Cloudflare Pages12 to host the site as it’s quite simple, convenient and cheap (if you know of any better ones do let me know). So I looked into Cloudflare workers with R2 storage (Cloudflare’s alternative to amazon S3 buckets). Essentially, you create an R2 bucket, upload your .dmg file to it and then hook it up to a worker which accepts a GET request and has a defined behaviour upon receiving a GET - the behaviour being to return the .dmg file for download. This is all free up to a certain point, however I faced some issues with the Cloudflare dashboard, it would keep freezing when I tried to edit my worker, it is possible to edit locally but this moment made me realise that perhaps I had over complicated things.
Taking a step back I settled on a much simpler approach to handle releases. I am now using GitHub releases13! It’s a straightforward method to setup: create a GitHub repo, navigate to releases (found on the right hand side panel), upload your release with a version number and a short description and that’s it! It’s a very neat way to keep everything in one place. GitHub releases can be created on both open source and closed source apps. For a closed source app you can create an empty GitHub repo and upload only your release .dmg file for distribution.
Future Plan for EyesOff
I have many ideas to improve the app from UI development, to underlying model changes. One big one is creating versions which work on Windows, Linux and older Macs. https://www.eyesoff.app has a development roadmap, feel free to contribute on the GitHub :)
1 Now, there are other methods to stop these sorts of intrusions, such as privacy screens. However, they can face some issues such as: getting lost, getting damaged, being expensive or making it difficult for others to see your screen as in if you want your friends to look at something on your laptop it can be a challenge. These make up some of the practical reasons to build and use a tool like EyesOff.
2 To get an idea for how small this truly is, the “small” language models we discuss these days are often around 3-7billion parameters. These models require at least a 24GB GPU to run and take a lot of power, whereas YuNet can run on a regular CPU efficiently enough to be unnoticeable.
3 OpenCV provide code to run YuNet and many other models simply in their zoo: https://github.com/opencv/opencv_zoo/tree/main/models/face_detection_yunet
4 MediaPipe is a library of small local models offered by Google. They cover a range of tasks and are quite good. They have a model called BlazeFace which I used during the early stages of EyesOff. However, it only covered short range detections. They had a long range version which was scheduled for release, however it has been marked as coming soon for over a year, so I’m not sure it ever will be released.
5 Running models locally can be enabled by two main things, making compute cheaper and more accessible or by making models smaller. On the latter nowadays there are a few ways to do this, we can even take larger models and reduce the memory requirements needed to run them. e.g. look at libraries such as https://docs.unsloth.ai, they provide the framework to get large models running on your hardware! YuNet fits neatly into the first category however, the authors made a very strong model which is incredibly small.
6 https://docs.anthropic.com/en/docs/agents-and-tools/claude-code/overview
8 As stated by John Carmack in his Lex Fridman podcast
9 https://github.com/glyph/Encrust The author also has a deep dive on publishing a Python macOS app. It goes into a lot greater depth than this blog: https://blog.glyph.im/2023/03/py-mac-app-for-real.html
10 https://pyinstaller.org/en/stable/
11 Feel free to send an email if you need help setting up your mac app @ yusufmohammad@live.com
12 https://pages.cloudflare.com
13 https://docs.github.com/en/repositories/releasing-projects-on-github/about-releases